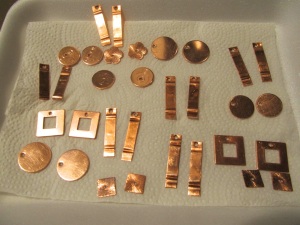
Cleaned copper earring pieces.
All pieces have to be cleaned thoroughly to remove any debris or oils from your fingers. Don’t even pick them up at this point! I then coat them with Klyr Fire to allow the cleaned surface to accept the copper soon to be torched onto the surface.

Enamel has been torched onto the pieces. It takes practice to get the two pieces to match.
Each color is a separate torching unless you get to the point of trusting your firing technique enough to know what the colors will look like if they combine. I do it both ways now, but I still like the randomness of the color results.

Pickling the pieces for removal of the fire scale.
I use an eco-friendly, safe-for-your-skin pickle: vinegar and salt. I let the pieces bathe in the solution for several hours. The fire scale lifts off and the surfaces can be cleaned further with a green scrubby pad if needed.

I use a two-part cured acrylic finish for the backs
Although many artists counter-enamel the backs of their enameled pieces (torching a layer of enamel on the underside) but I just cannot get myself to do this! I love the look of the bright shiny copper after the surfaces are cleaned. So… I have found that a layer of a quality two part acrylic de-stresses the enamel of the opposite side. No cracking or slivering off of the enameled surface (ask me how I know about this :)) I love the finished pieces that have the bright copper on the back. It just looks nicer this way.
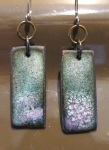
Here are some assembled pairs from this group of work: